 |
| Crunchy, sugared, nut-filled snowballs |
Monday, December 21, 2020
Friday, December 18, 2020

Wednesday, December 16, 2020

Monday, December 14, 2020
Herbs de Provence Sweet Pepper Soup
 |
| With Gruyure Croutons |
Herbes de Provence is a mix of dried herbs popular in the south of France. The version I found at the bulk foods store recently included fennel seeds, thyme, dried basil, rosemary, oregano, dried savory, marjoram and lavender buds. I thought the aromatic herbs might work well with sweet peppers for a soup.
Saturday, December 12, 2020

Monday, November 30, 2020

Tuesday, November 24, 2020
Whole Wheat Cranberry Nut Bread (Deaf Smith) from Peigi
 |
| Tart and Nutty |
While I was making Cranberry Sauce with Orange Marmalade today for Thanksgiving, I remembered Peigi had given me this recipe; so, I hijacked a cup of cranberries to make it. Delicious! --B
Saturday, November 21, 2020
Paper Bag Apple Pie
 |
| Unconventional but Very Good |
Wednesday, November 18, 2020
Scallops with Pancetta, Pureed Butternut Squash and Lima Beans
 |
| Edamame would work well if you don't like lima beans |
Sunday, November 15, 2020
Porcini Powder and Magic Mushroom Soup (Patricia Wells)
 |
| My new cooking superpower |
You may have noticed that I have using porcini powder in my Fall cooking. I have discovered it provides an earthiness and umami to meats and veggies.
Friday, November 13, 2020
Acorn Squash with Smokey Blue Cheese
 |
| Savory not Sweet |
I've made this dish twice now, and keep thinking about making it again. I have never had acorn squash this way. The blue cheese is an unexpected delicious element.
Wednesday, November 11, 2020
Pork Tenderloin with Apple Cider Sauce
 |
| Easy and Versatile |
Monday, November 9, 2020
Crudités Mustard Lemon Zest Dipping Sauce
 |
| Individual Dipping "Boats" |
Saturday, November 7, 2020
Zucchini Canapes (Jacques Pepin)
 |
| Parmesan, Smoked Paprika, Poppy Seeds and Toasted Sesame Seeds |
Jacques Pepin has a new cookbook called Quick & Simple. He is one of my all time favorite TV chefs and cookbook authors. Plus he is a painter, too. The new cookbook is filled with his colorful work.
Saturday, October 31, 2020
Ina Garten’s Fish Chowder

Ina Garten has a new cookbook, Modern Comfort Food. I’ve been reviewing it for ideas for new meals during Covid.
Sunday, October 4, 2020
Honey Bourbon Cake
 |
| For Honey Lovers |
Luckily, Peigi gave me some more of her delicious honey, so I was able to make a second attempt at this cake. My first honey cake tasted great but was too dry. (I forgot to put the timer on!)
Tuesday, September 29, 2020
Flank Steak with Basil Dressing (Cook's Country)
 |
| Here's how ours turned out |
Our local PBS station runs Cook's Country on Saturday afternoons, and I frequently watch it, especially if I am doing the laundry while Tom watches college football.
Thursday, September 3, 2020
Cream Biscuits with Sliced Peaches
 |
| Fuzzy and Sweet |
It is prime time for local peaches here. They are wonderful to eat one at a time, or sliced with a little sugar over creamed biscuits for dessert.
Monday, August 31, 2020
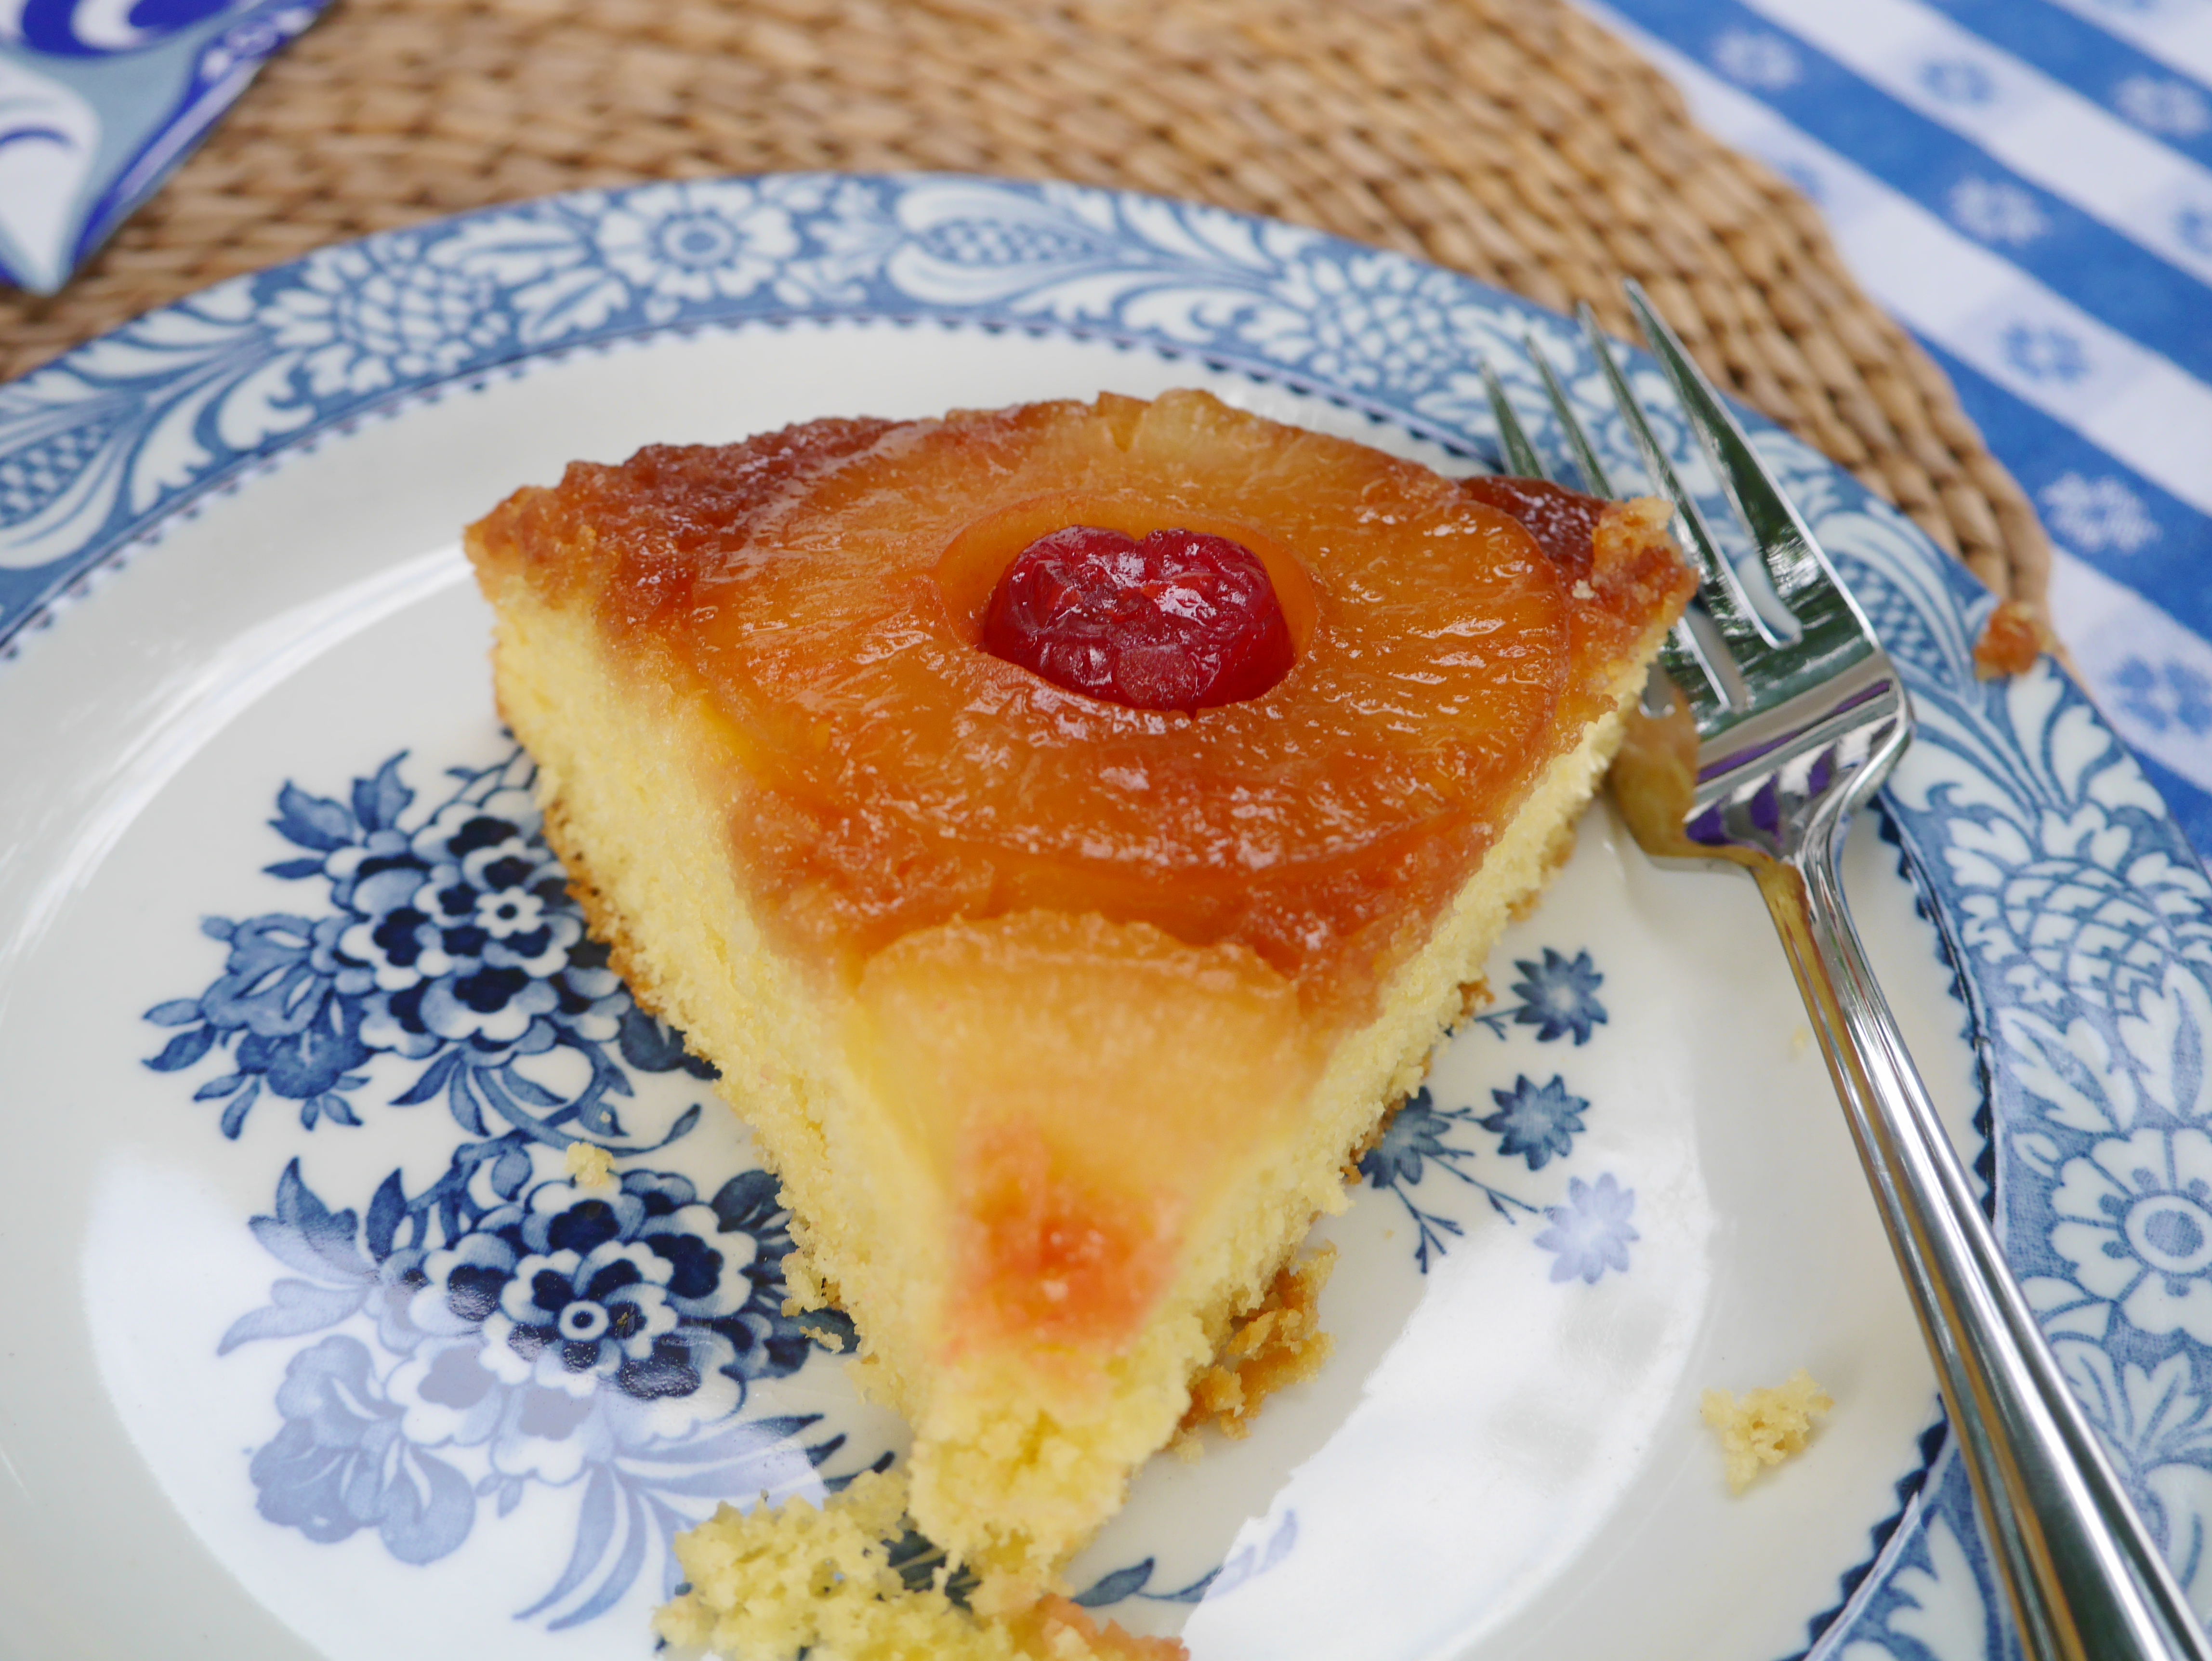
Pineapple Upside Down Cake
 |
| An American Classic |

I found this specialty cake pan ---including the typed recipe--- among my late Aunt Shirley's kitchen items when we cleaned out her condo. She enjoyed baking and making candy, and had an assortment of vintage items like jello molds and other 70'- 80's novelty desserts.

Nordic Ware still makes a cake pan like this. But my research says that her yellow one is probably from the 80's when they ran a national ad. Here is a clipping from 1982 in the Pittsburgh paper, which could be how my aunt Shirley acquired hers.
It turns out that upside-down cakes have been popular for centuries. They were first made in cast iron skillets, with a topping melted in the pan, then a cake batter added. When done, the pan was turned upside down and the round cake would have a beautiful syrupy topping.

However, the ubiquitous one we know today came about in 1925. Dole Pineapple wanted to promote the use of their pineapple slices and held a contest. And marachino cherries had just been "invented" by the Oregon cherry industry.

In the beginning, the cake was made from scratch. But by the 80's a store-bought cake mix was standard.
We chose a Duncan Hines Yellow Cake mix. The recipe only calls for half of the mix, so I made a bonus cake with mandarin oranges. But you could make cupcakes or mini-loaves, too.
---Barbara
Pineapple Upside Down Cake
1/4 cup butter
1/2 cup bown sugar
7 slices pineapple (No. 2 or 1 lb. 4oz can)
2 T. of juice from the can
Marachino cherries
1/2 of the batter from a white or yellow cake mix*
Cake mixes usually take 3 eggs, 1/2 cup oil, and 1 cup water
*use the 2nd half of the cake batter for a 2nd cake or cupcakes
Preheat the oven to 350 degrees.
Even though the photo doesn't show it, I would recommend cutting up the butter into small pieces and spread around the cake pan. Add the 2 T. of juice from the can of pineappple slices. Spread the brown sugar around the cake pan.

Place in the oven and let the butter and sugar melt. Remove.
Arrange the pineapple slices --- one in the center and 6 more around the edge in a circle.

Remove the stems from 7 maraschino cherries and place them in the center of each pineapple slice.
Prepare the cake mix per the package directions.
For best results, I recommend using room temperature eggs, and thoroughly mixing the eggs, oil and water before adding the dry cake mix. I sifted the cake mix, which can become compacted from sitting on the store shelf. All of these steps will make a lighter, flufflier cake.

Using a measuring cup, add two cups of batter to the prepared caked pan. Carefully spread it all over the tops of the pineapple and syrup until you only have batter on top, and no syrup showing.
Use the remaining batter, which is about 2 more cups to make another cake, or cupcakes or miniloaves.

Bake for 35 minutes and test to see if it is done by inserting a toothpick. It will come out clean when the cake is ready. My cake took 40 minutes. But it could take as long as 50 minutes, depending on the depth of your cake pan. Likewise, if your pan is very shallow, it could take less time.
Remove from the oven and let stand for 5 minutes. The cake will pull away from the edges.

Invert on to a serving plate.

Allow 2-3 minutes before removing the pan.

Serve warm with whipped cream or at room temperature which is how we prefer to serve it.
We liked the ratio of pineapple topping to cake but you could use a whole cake mix (4 cups of batter instead of 2) if you like more cake.
B
Thursday, August 27, 2020
Swordfish with Cilantro Lime Butter

Recently I have been creating aluminum foil packets for our fish, so Tom can cook it easily on the grill, and the fish remains moist.
You can do any fish and flavor combination you like -- I've done halibut with lemon, chervil and garlic wrapped in a lettuce leaf, for example.
This combination of cilantro, garlic and lime worked very well with swordfish, but could be used with any other fish you like.
It's the technique that makes a difference: En papillote*. The ingredients permeate the fish and creates a sauce; steaming keeps it tender and moist.
---Barbara
*en papillote is a French term for baking food in a folded pouch, usually made of parchment paper.
Swordfish with Cilantro Lime Butter
Serves 2
2 6-ounce swordfish steaks
2 limes
2/3 cup fresh cilantro sprigs
2 T. butter
1/4 t. garlic powder
salt
aluminum foil, preferably heavy duty
Tear off a large sheet of aluminum foil.
Slice the first lime, very thinly, and create a bed of slices for each piece of fish.

Pat the fish dry, salt both sides, then place on top of the sliced lime beds.
Then, sprinkle a generous amount of garlic powder on top.

Place a tablespoon of butter on top of each fish.
Add a bunch of cilantro on top of each piece of fish.
Squeeze 1/2 of the second lime over the top of both pieces of fish.
Save the second half of the second lime for use at the table, if desired.
To create a packet for grilling, bring the short sides up to the center, carefully fold the foil seam over at least three times, to be sure the juices do not run out. Then fold each of the long sides over at least three times to be sure the juices do not run out. It doesn't have to look nice, it just needs to be secure.
Grill on a hot grill for 10-12 minutes depending on the thickness of your swordfish steak.

Carefully unwrap the fish --- it will be steaming hot --- and lift the fish on to serving plates, and add juices, and a slice of lime to each piece.
B
Sunday, August 23, 2020
Grilled Mexican Street Corn Salad from Christine
 |
| Shucking Season |
We made a great roasted corn salad recipe twice this month! I didn't take photos but I really recommend!
This salad can be made several days in advance. Cover and chill until ready to eat.
---Christine
Grilled Mexican Street Corn Salad
(from A Spicy Perspective)
Serves 8
6-7 ears fresh corn
1 cup diced red bell pepper
3/4 cup chopped scallions
1/2 cup chopped cilantro
1/2 cup crubled cotija cheese (or feta)
1/4 cup mayonnaise
2 T. fresh lime juice
1/2 teaspoon smoked paprika
salt and pepper
Preheat the grill to high. Shuck the corn and remove any remaining silk strands.
Grill the corn for 2 minutes per side, 8 minutes in total. Remove.
Allow the corn to cool, then use a serrated knife to cut the corn off the cobs. (I set a small bowl up side down in a larger bowl, so the cut corn falls into the larger bowl.)
To a salad bowl, add the diced bell pepper, scallions, and cilantro. Add the grilled corn. Toss to mix.
In a smaller bowl, whisk the mayo, lime juice and paprika together. Toss the dressing into the salad.
Finally toss in the cheese, reserving a little to sprinkle on top. Taste, and add salt and pepper as needed.
Sprinkle cheese over the top and serve.
Can be made several days ahead if covered and refrigerated.
---Christine
Thursday, August 13, 2020
Coconut Macaroons (Gluten Free) by Colleen
 |
| Gift-bagged and Ready to Give Away |
Baking coconut macaroons but I needed to make them gluten free for a friend so I modified the recipe on the bag. It is not too different, but it has a little less sugar and no flour.
It is similar to other macaroon recipes I’ve seen, except it uses significantly more coconut. The bag holds about 5 cups - most recipes call for 3 cups. I think using the whole bag is smart to give you the coconut flavor and to use up a bag, because who needs a few ounces of coconut drying out in the fridge???
I am not even a huge coconut fan and I really like these. I am going to try them with chopped toasted pecans next.
---Colleen
Coconut Macaroons (Gluten Free)
Makes 18-20
1 14 oz bag of Angel Flake coconut, toasted
1/2 cup sugar
4 egg whites
1 teaspoon almond extract
1/4 teaspoon salt
Layer the coconut on a sheet pan and toast at 350 for 5 minutes and let cool.
Whip the egg whites, sugar, almond and salt together until frothy - the longer the better.
Mix in the cooled coconut and use a small scoop to form cookies about 1 inch apart on a cookie sheet lined with parchment.
Bake for 17-20 minutes in 350 degree oven until set and lightly browned, but be careful not to overbake/overbrown.
You can drizzle with chocolate or dip in chocolate if you like that flavor profile.
---Colleen
You can drizzle with chocolate or dip in chocolate if you like that flavor profile.
---Colleen
Tuesday, July 28, 2020
Tuscan Kale Salad (NYTimes) from Peigi
 |
| Tuscan kale is also know as lacinato kale |
Good and easy! I have used regular and Tuscan kales. Both are good. Keeps well. We make a big batch and eat it for several days.
--- Peigi
 |
| Photo is from NYTimes https://cooking.nytimes.com/recipes/11746-tuscan-kale-salad |
Tuscan Kale Salad
(adapted from Melissa Clark of NYTimes)
Serves 2 to 4
1 bunch Tuscan kale
1 thin slice country bread
(or 1/4 cup homemade bread crumbs)
1/2 garlic clove, finely chopped
1/4 cup finely grated percorino cheese, plus more for garnish
3 T. extra virgin olive oil, plus more for garnish
freshly squeezed juice of 1 lemon
1/4 t. kosher salt (1/8 t. regular salt)
red pepper flakes to taste
ground black pepper to taste
Trim the bottom 2 inches off kale stems and discard. Slice kale, including ribs, into 3/4-inch ribbons.
About 4 to 5 cups.
Place kale in a large bowl.
If using bread, toast until golden on both sides. Tear it into small pieces and grind in a food processor until mixture forms coarse crumbs.
Using the back of a knife, pound the garlic into a paste. Transfer garlic to a small bowl. Add 1/4 cup cheese, 3 T. oil, lemon juice, salt, pepper flakes and black pepper. Whisk to combine.
Pour dressing over kale and toss very well to thoroughly combine. Dressing will be thick and need lots of tossing to coat the leaves.
Let salad sit for 5 minutes, then serve topped with bread crumbs, additional cheese and a drizzle of oil.
Saturday, July 25, 2020
Chocolate Buttermilk Muffins

Been making batches of these and freezing them. That's because I had a bottle of whole buttermilk to use up. We pull out one for each of us in the mornings to have with coffee. And I have been taking them as my housewarming gift, to good reviews.
Very chocolately and moist.
It took me a while to get the proper combination of leavening to go with the cocoa powder and buttermilk. (Had to add baking soda.) Also, I tried butter, but oil makes a much moister muffin.
With frosting, these would be considered cupcakes, I think. :)
---Barbara
Chocolate Buttermilk Muffins
Makes 12 muffins
2 cups all purpose flour, fluffed then scooped
1/2 cup dutch process cocoa powder
1/4 t. salt
2 t. baking powder
1/2 t. baking soda
1 cup dark chocolate chips
2 eggs, room temperature
3/4 cup sugar
1/3 cup canola oil
1 t. vanilla
1 cup whole buttermilk
powdered sugar for dusting (optional)
Preheat the oven to 350 degrees.
Spray a 12-cup muffin tin with baking spray or grease well with butter.
In a larger mixing bowl, add the dry ingredients: flour, cocoa powder, salt, baking powder, baking soda and chocolate chips. Mix thoroughly until evenly mixed. Be sure the salt and baking powder/soda are evenly distributed.
In a mixing bowl, whisk together the eggs and sugar, until lemony yellow and very smooth.
Add the oil and the vanilla, and whisk until combined. Then add the buttermilk, and whisk until smooth.
Pour the liquid ingredients on top of the dry ingredients all at once. Then, use a spatula to fold the mixture together, just until combined. Do not overmix or the muffins will be tough.
Use a scoop, like an ice cream scoop or a small measuring cup, and evenly divide the batter into the muffin tin.
Bake in the oven for 18 minutes or until a toothpick comes out clean.
Cool in the tin for about 15 minutes, until the chocolate chips are cooled enough to safely remove the muffins.
Remove and finish cooling on a wire rack.
Dust with powdered sugar, if you wish.
Freezes well, once completely cooled.
B
Thursday, July 16, 2020
Easy Arugula Salad with Orange Shallot Dressing from Cindy
 |
1 bag of pre-washed greens, arugula or spinach
1 T. diced shallot
3 to 1 ratio olive oil to orange juice
- 9 T. extra virgin olive oil
- 3 T. orange juice
salt and pepper
 Add the dressing to the bottom of the bowl, then add the arugula a little at a time and toss it all together.
 The greens will start to wilt a little. Be sure all of the greens are evenly coated.
1 T. diced shallot
3 to 1 ratio olive oil to orange juice
- 9 T. extra virgin olive oil
- 3 T. orange juice
salt and pepper
---Cindy
Monday, July 13, 2020
Glazed Pork Tenderloin in The Oven by Barbara
.jpg) |
We like pork tenderloins. So, I am always playing around with new ways to make them. This is my way to do it in the oven-- the meat turns out exceptionally moist and flavorful.
--Barbara
Glazed Pork Tenderloin in the Oven
Serves 4
1 pork tenderloin, dried with paper toweling
2 - 3 T. jelly, such as plum, blackberry, pear or apricot
1 T. minced garlic
1/4 t. red pepper flakes (or more if you prefer)
a sprig of fresh rosemary (optional)
salt and pepper
.jpg) Dry off the pork tenderloin with a paper towel. (You don't want the meat to steam.)
Dry off the pork tenderloin with a paper towel. (You don't want the meat to steam.).jpg)
Place the tenderloin on the foil on a sturdy roasting pan (one that can take broiling). Then spoon over the top whatever jelly or jam you have on hand --- this time I used a pear berry one we received as a gift. Spoon lots of garlic on top, too. Sprinkle with red pepper flakes for some heat to balance the sweet of the jam. Layer rosemary on top and next to it. Season with pepper and salt.
.jpg) Wrap it up tightly so that the juices won't run out. Then roast at 350 degrees for about 25 - 35 minutes, depending on the size of the tenderloin. Then, take it out and turn on the broiler.
Wrap it up tightly so that the juices won't run out. Then roast at 350 degrees for about 25 - 35 minutes, depending on the size of the tenderloin. Then, take it out and turn on the broiler. .jpg) Carefully unwrap it, folding down the sides to expose the meat for broiling, but leaving enough height to contain the juices. Broil until you get a good char and the internal temperature is 140 - 150 degrees, then take it out and let it rest -- the temperature will continue to rise to 165 degrees after about 10 minutes. Remove the charred rosemary, slice and serve with the pan juices.
Carefully unwrap it, folding down the sides to expose the meat for broiling, but leaving enough height to contain the juices. Broil until you get a good char and the internal temperature is 140 - 150 degrees, then take it out and let it rest -- the temperature will continue to rise to 165 degrees after about 10 minutes. Remove the charred rosemary, slice and serve with the pan juices.
.jpg) Wrap it up tightly so that the juices won't run out. Then roast at 350 degrees for about 25 - 35 minutes, depending on the size of the tenderloin. Then, take it out and turn on the broiler. Carefully unwrap it, folding down the sides to expose the meat for broiling, but leaving enough height to contain the juices. Broil until you get a good char and the internal temperature is 140 - 150 degrees, then take it out and let it rest -- the temperature will continue to rise to 165 degrees after about 10 minutes. Remove the charred rosemary, slice and serve with the pan juices.
Wrap it up tightly so that the juices won't run out. Then roast at 350 degrees for about 25 - 35 minutes, depending on the size of the tenderloin. Then, take it out and turn on the broiler. Carefully unwrap it, folding down the sides to expose the meat for broiling, but leaving enough height to contain the juices. Broil until you get a good char and the internal temperature is 140 - 150 degrees, then take it out and let it rest -- the temperature will continue to rise to 165 degrees after about 10 minutes. Remove the charred rosemary, slice and serve with the pan juices.
B
Tuesday, July 7, 2020
Summertime Potato Salad (Gram's)

UPDATED 2023
This is the potato salad I make every summer. I learned to make it this way from my late mother-in-law. She would add oil and vinegar, salt and pepper, to the steaming hot potatoes, toss them, then layer the other ingredients on top. Only when the potato salad was completely cold would she add the mayonnaise.
When we would visit them at their cottage at the Thousand Islands, you would open the door to the fridge, and instantly smell eggs, onions, and potatoes, then see a big bowl of potato salad waiting to be dressed.
So that's what I do, too. I never wrote down her recipe, but I think mine is similar. I serve it at our cottage here in the Finger Lakes, when we have a crowd.
---Barbara

Summertime Potato Salad (Gram's)
Serves 16-20
3 lbs. golden potatoes, skins on
4-6 hard boiled eggs
3 T. canola oil
1.5 T. apple cider vinegar
3 t. salt (the potatoes require more salt than you think)
1 sweet onion (make sure it is sweet)
3-4 celery ribs, leaves included
1 T. celery seeds
1 T. mustard seeds (optional)
1 15-ounce small jar light Hellman's mayonnaise

In a small saucepan, add the eggs, add enough cold water until they are completely covered. Bring to a gentle boil, set the timer and cook for 1 minute, then turn off the heat, cover the pan, and set the timer for 10 minutes. Then, pour off the hot water, and run cold water over the eggs, until the water runs cool. Drain. Refrigerate until the eggs are completely cold.
In a large pot, about 6 quarts, add cold water about 2/3 of the way up.

Rinse the potatoes, leave skins on, then slice into bite size pieces, usually a small potato will be cut in half, and then half again, making quarters. If your potatoes are bigger, cut it into 6 pieces.

Add the potatoes to the cold water in the pot as you go. When done quartering the potatoes, put the pot on the stove and bring to a gentle boil.

This will take quite a while. Be patient. When they come to a gentle boil, turn down to low, and set the timer for 12 minutes and cook until opaque.

Check at 10 minutes to see if they are done. Don't overcook them. Stick a knife in one to test how firm they are. They will be opaque if done, and the knife will stick enough for you to pull one out with it. Let cool before sampling. Very hot!

Meanwhile, in your large serving bowl (preferably one with a cover), place the oil and vinegar together in the bottom and whisk together. If you are using the mustard seeds, add them now, so they will hydrate in the oil and vinegar.

Chop the sweet onion into very small pieces. Chop the celery into small pieces, too. Use the leaves too. Crack and peel the cold eggs, and set aside.
In a colander, placed in a clean sink, use hot pads and drain the potatoes, being careful to avoid the hot steam. Drain well.

Place them in the serving bowl. Sprinkle the 3 t. of salt, and the 1 T. of celery seed, over the potatoes, then use a large spoon or spatula to gently toss the potatoes in the vinaigrette.
Now, sprinkle the onion over the hot potatoes.

Next, add the celery as the second layer.

Then, slice the eggs, using an egg slicer, and layer the eggs evenly over the top. Sprinkle lightly with salt.

Refrigerate, uncovered, for about 2 hours or until completely cold. Chill the mayo, too

When chilled, add the mayonnaise, and fold gently until the salad is evenly mixed. I used to add a little mayo at a time, until it seemed like there was enough, but now I know it will take the whole jar.

You want it to flow, and coat everything evenly. Taste, and add salt if needed.
Refrigerate until time to serve.
B
Subscribe to:
Posts (Atom)